The purpose of this article is to demonstrate how to disable the self imposed 4GB memory limit on 32 Bit (x86) versions of Windows Vista and Windows 7. If your wondering why I said "self imposed", its because the 4GB limit is not a limitation of the 32 Bit operating mode on modern x86 CPU's. Most modern CPU's (Since the Pentium Pro Era, circa 1995) have included support for the Page Address Extension (PAE). This allows those CPU's supporting that feature to effectively address up to 64GB of total memory. Something else you might want to read would be 3GB Barrier. This explains why even with 4GB of memory, you usually dont see all of it.
So why does Microsoft 32 Bit versions of Vista and 7 only support 4GB of memory? Its not because they don't support the PAE feature of x86 CPU's, but rather because they self impose the limit. The reason they do this is because some old 32 Bit drivers that directly accessed memory through there physical addresses assumed that the address space space 32 bits (when its actually 36 bits with PAE enabled). However, these drivers are few and far between, as Microsoft as not only discouraged this, but I don't believe they will certify a 32 Bit driver if they assume so. Not only that, drivers that need to do so are not very common. In fact x86 version of Windows XP and Windows XP SP1 support more than 4GB of memory, with the self imposed limit first occurring in the SP2 update.
So how can you get rid of this limit? Well, its not a simple registry edit (unfortunately). You must modify the NT kernel itself to change the way it executes. While this is easy enough with a hex editor, you cannot simply modify system files without Windows knowing and preventing itself from loading. In fact, if you simply modify the kernel, upon restart windows will automatically enter repair mode (it did for me) which will restore the system files back to there original state.
You must do several additonal steps in order to get Windows to load and execute the modified kernel. You must first redo the checksum for the kernel, then resign the kernel itself and run Windows in Test Mode. Test Mode simply allows drivers that have been signed from an untrusted source to run. This is normally used for driver developers to test there drivers before having Microsoft sign them.
Tools:
Hex Editor: I will be using HxD in the example. You can download it here.
You will also need to have some tools that are provided with Visual Studio. Unfortunately, you have to install Visual Studio C++ Express edition in order to get them. The 2008 version will work, so I would recommend downloading that. You can find it here. Select Visual Studio 2008 Express on the top bar, then Visual C++ 2008 Edition. Its a fairly large download (70MB ish I believe) but its definitely worth it if it means gaining the ability to use another GB of RAM or more.
Disclaimer:
You will be copying the kernel, and modifying it, and creating a new boot option to load it. This should allow you to boot to the unmodified kernel any time you like, but it still poses risks. Im not responsible for any damage you do to your computer. If you screw up the normal kernel and cannot load windows, you should be able to repair the install without the install disk. Worst case scenario you have to reinstall Windows. But if have a machine with 4GB+ of RAM with an x86 version of Windows 7\Vista (surprisingly common with OEMs) then this hack can let you access all of your RAM without having to shell out any cash for a x64 version of Windows.
Even if you successfully modify the kernel and can run Windows, your computer may become unstable because of drivers that were poorly written. However, I doubt you will have troubles running most drivers.
Procedure:
The very first thing you need to do is take ownership of the kernel file you will be modifying. By default system files are owned by the user Trusted Installer, so you cant modify them. In order to do this you need to open up the command prompt. Search for cmd and it should come right up. Its in the Windows\System32 folder if you have trouble finding it, You must use the run as admistrator option if you have UAC enabled as well. Then type the following command.
Note that you must be in the C:\Windows\System32 folder (you will have to change the drive letter if appropriate) in order for this to work. You can get there by using this command
Now navigate to the System32 in windows explorer (the normal folder browser), and right click ntkrnlpa and go to properties. Open up the Security tab, click Edit, Administrators, and enable Full Control. Now copy ntkrnlpa.exe, and paste it on to your desktop and rename it to ntkl64g (you can choose any name you like, just be sure to make the appropriate changes in the commands listed later). If Windows is giving you grief about the copy\paste operation, this probably means you didnt properly grant yourself full control.
Next you will need to open up the new file in a Hex Editor. Please note that the following values are in Hexadecimal.
Search for the hex string 7C 11 8B 45 FC 85 C0 74 0A and 7C 10 8B 45 FC 85 C0 74 09. (when you search for it, dont include the spaces) They should be very close together, known file offsets for the versions are listed below.
You will need to change the 8B 45 FC 85 C0 74 xx part of both strings with B8 00 00 02 00 90 90. You can see exactly how you do this in HxD in the screenshots below.
Remember that you have to do this for BOTH strings.
Now open up command prompt again (remember to run as administrator), you will need to do several things.
1. Set the Visual Studio tool variables.
2. Change the new kernels checksum
3. Make a new certificate to sign it with
4. Sign the new kernel with your certificate
5. Create a new bootloader option to boot the modified kernel (easier than it sounds).
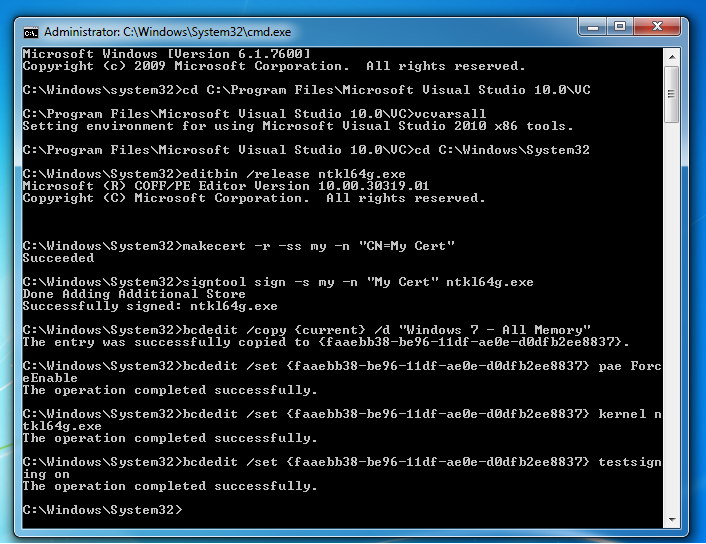
The commands for the first 4 steps should looks something like this
The output should looks very similar to mine below. Note that I have VS2010 installed, which is why it says "Visual Studio 10.0" and not 9.0.
Now you will need to create the new settings. This can be done with the following commands. Note that you can use any name you choose for your settings, and that the bcdedit command is available without setting the Visual Studio variables.
You will have to replace the {guid} part with the guid the first command gives you. This will be a long string of hex characters. You will have to type it out for the first command, but after that, just press the up key, and your previous command will show up, just delete the "pae ForceEnable" part, and add then ext command. The entire command output (above part included) can be seen below.
Now reboot and you select your new setting. It will appear as if it is a separate Windows installation (but its obviously not). If everything worked Windows should boot like normal. If Windows goes in to repair mode, you probably didnt redo the checksum\resign the modified kernel property. If you run in to another issue, the hack might not work on your system. Dont panic, simply reboot and use the normal "Windows 7" option. If its still not working properly (this shouldnt happen), then reboot again, and repair the Windows installation (remember you dont need the install disk to do this anymore).
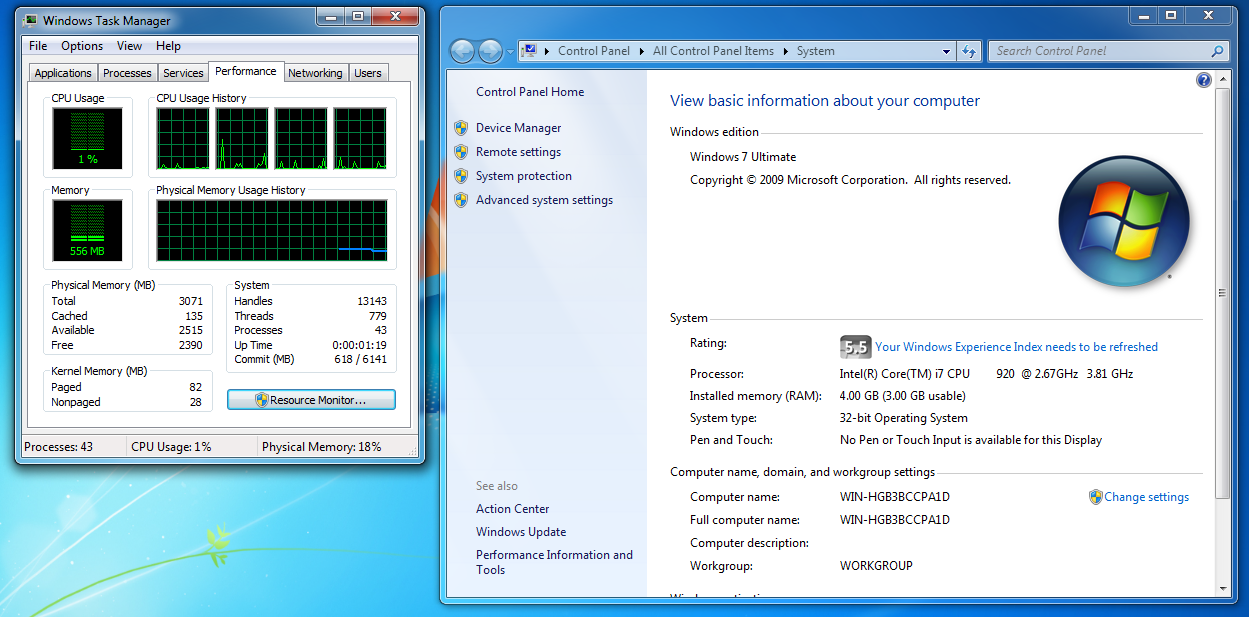
Results on my VMware Virtual Machine with it set to 4096MB:
BEFORE:
http://i175.photobucket.c.../windows7x86before.png
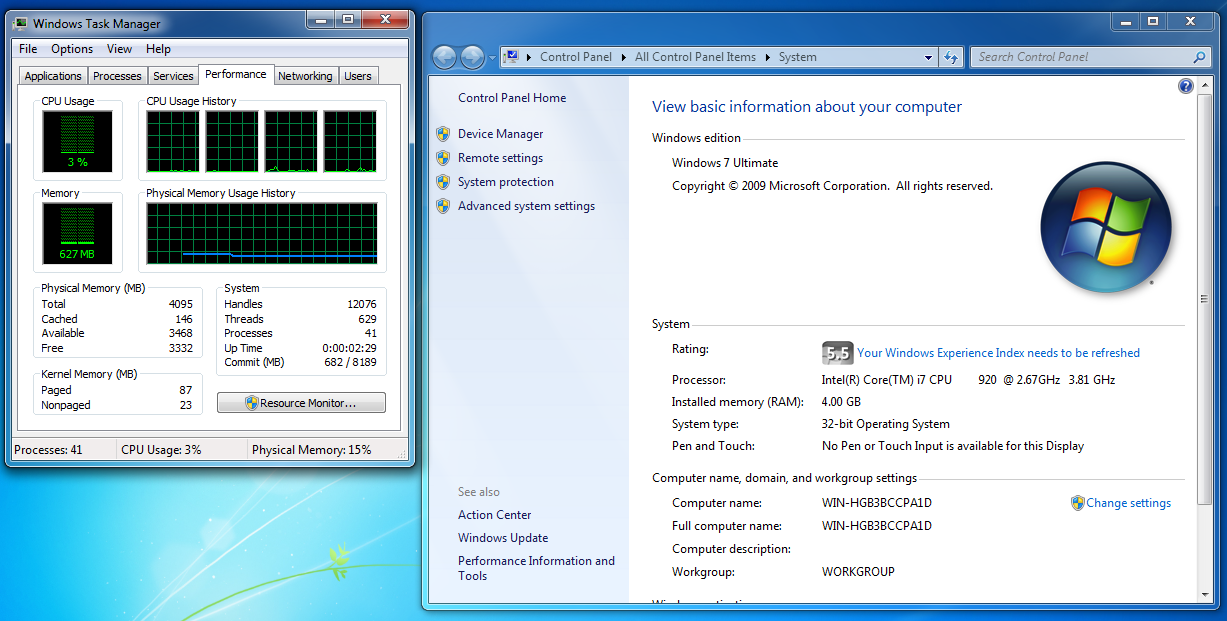
AFTER:
http://i175.photobucket.c...6/windows7x86after.png
Conclusion:
The process is by no means simple or safe, but it does work in most cases. If you have a computer with 4GB of RAM or more and only have a 32 Bit version of Windows Vista\7, then this hack can save you the $100 if you were going to go out and buy a x64 version of Windows. There are a lot of OEM's that still ship 32 Bit versions of Vista\7 with computers that have 4GB of memory (and sometimes more), and there is no reason that you should be stuck with the 4GB limitation in all cases.
Good Luck!
So why does Microsoft 32 Bit versions of Vista and 7 only support 4GB of memory? Its not because they don't support the PAE feature of x86 CPU's, but rather because they self impose the limit. The reason they do this is because some old 32 Bit drivers that directly accessed memory through there physical addresses assumed that the address space space 32 bits (when its actually 36 bits with PAE enabled). However, these drivers are few and far between, as Microsoft as not only discouraged this, but I don't believe they will certify a 32 Bit driver if they assume so. Not only that, drivers that need to do so are not very common. In fact x86 version of Windows XP and Windows XP SP1 support more than 4GB of memory, with the self imposed limit first occurring in the SP2 update.
So how can you get rid of this limit? Well, its not a simple registry edit (unfortunately). You must modify the NT kernel itself to change the way it executes. While this is easy enough with a hex editor, you cannot simply modify system files without Windows knowing and preventing itself from loading. In fact, if you simply modify the kernel, upon restart windows will automatically enter repair mode (it did for me) which will restore the system files back to there original state.
You must do several additonal steps in order to get Windows to load and execute the modified kernel. You must first redo the checksum for the kernel, then resign the kernel itself and run Windows in Test Mode. Test Mode simply allows drivers that have been signed from an untrusted source to run. This is normally used for driver developers to test there drivers before having Microsoft sign them.
Tools:
Hex Editor: I will be using HxD in the example. You can download it here.
You will also need to have some tools that are provided with Visual Studio. Unfortunately, you have to install Visual Studio C++ Express edition in order to get them. The 2008 version will work, so I would recommend downloading that. You can find it here. Select Visual Studio 2008 Express on the top bar, then Visual C++ 2008 Edition. Its a fairly large download (70MB ish I believe) but its definitely worth it if it means gaining the ability to use another GB of RAM or more.
Disclaimer:
You will be copying the kernel, and modifying it, and creating a new boot option to load it. This should allow you to boot to the unmodified kernel any time you like, but it still poses risks. Im not responsible for any damage you do to your computer. If you screw up the normal kernel and cannot load windows, you should be able to repair the install without the install disk. Worst case scenario you have to reinstall Windows. But if have a machine with 4GB+ of RAM with an x86 version of Windows 7\Vista (surprisingly common with OEMs) then this hack can let you access all of your RAM without having to shell out any cash for a x64 version of Windows.
Even if you successfully modify the kernel and can run Windows, your computer may become unstable because of drivers that were poorly written. However, I doubt you will have troubles running most drivers.
Procedure:
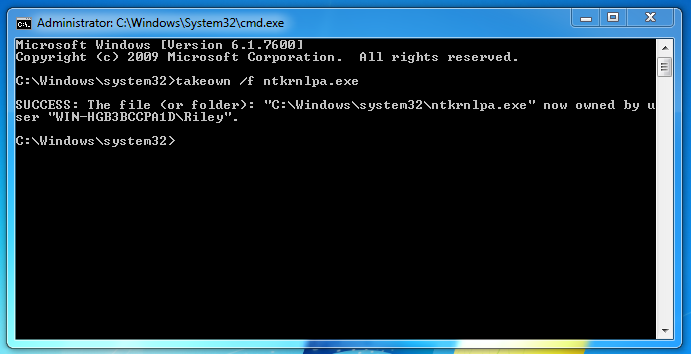
The very first thing you need to do is take ownership of the kernel file you will be modifying. By default system files are owned by the user Trusted Installer, so you cant modify them. In order to do this you need to open up the command prompt. Search for cmd and it should come right up. Its in the Windows\System32 folder if you have trouble finding it, You must use the run as admistrator option if you have UAC enabled as well. Then type the following command.
takeown /f ntkrnlpa.exe
Note that you must be in the C:\Windows\System32 folder (you will have to change the drive letter if appropriate) in order for this to work. You can get there by using this command
cd C:\Windows\System32
Now navigate to the System32 in windows explorer (the normal folder browser), and right click ntkrnlpa and go to properties. Open up the Security tab, click Edit, Administrators, and enable Full Control. Now copy ntkrnlpa.exe, and paste it on to your desktop and rename it to ntkl64g (you can choose any name you like, just be sure to make the appropriate changes in the commands listed later). If Windows is giving you grief about the copy\paste operation, this probably means you didnt properly grant yourself full control.
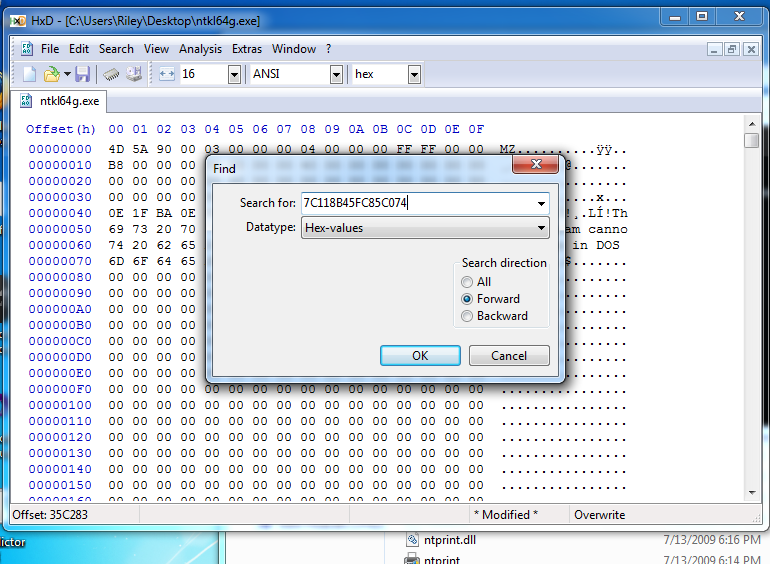
Next you will need to open up the new file in a Hex Editor. Please note that the following values are in Hexadecimal.
Search for the hex string 7C 11 8B 45 FC 85 C0 74 0A and 7C 10 8B 45 FC 85 C0 74 09. (when you search for it, dont include the spaces) They should be very close together, known file offsets for the versions are listed below.
 6.0.6000.16386    Windows Vista         0x003040B1, 0x003040F2
 6.0.6001.18000     Windows Vista SP1     0x00309AA3, 0x00309AE4
 6.0.6002.18005     Windows Vista SP2     0x0030C43A, 0x0030C47B
 6.1.7600.16385     Windows 7             0x0035C243, 0x0035C283
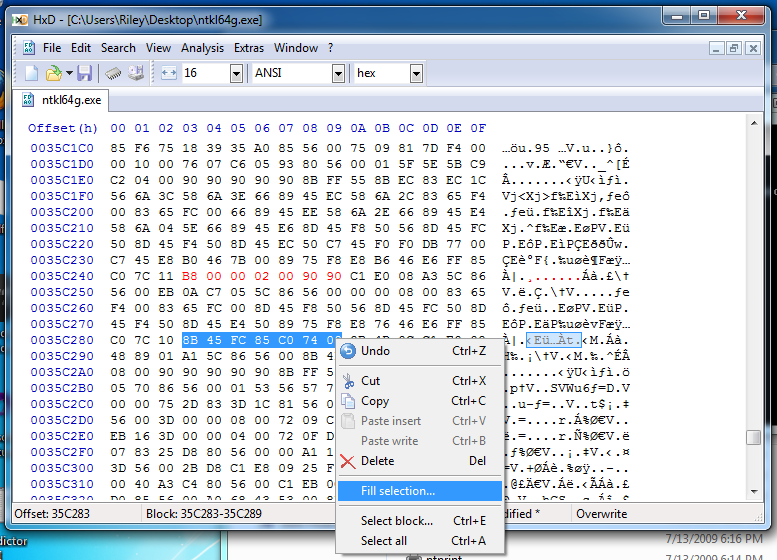
You will need to change the 8B 45 FC 85 C0 74 xx part of both strings with B8 00 00 02 00 90 90. You can see exactly how you do this in HxD in the screenshots below.
Remember that you have to do this for BOTH strings.
Now open up command prompt again (remember to run as administrator), you will need to do several things.
1. Set the Visual Studio tool variables.
2. Change the new kernels checksum
3. Make a new certificate to sign it with
4. Sign the new kernel with your certificate
5. Create a new bootloader option to boot the modified kernel (easier than it sounds).
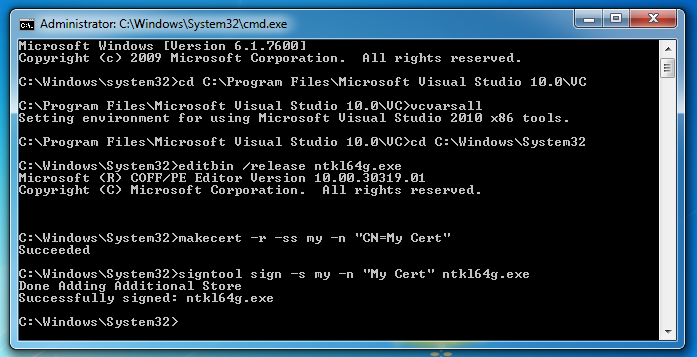
The commands for the first 4 steps should looks something like this
cd C:\Program Files\Microsoft Visual Studio 9.0\VC
vcvarsall
cd C:\Windows\System32
editbin /release ntkl64g.exe
makecert -r -ss my -n "CN=My Cert"
signtool sign -s my -n "My Cert" ntkl64g.exe
The output should looks very similar to mine below. Note that I have VS2010 installed, which is why it says "Visual Studio 10.0" and not 9.0.
Now you will need to create the new settings. This can be done with the following commands. Note that you can use any name you choose for your settings, and that the bcdedit command is available without setting the Visual Studio variables.
bcdedit /copy {current} /d "Windows 7 - All Memory"
bcdedit /set {guid} pae ForceEnable
bcdedit /set {guid} kernel ntkl64g.exe
bcdedit /set {guid} testsigning on
You will have to replace the {guid} part with the guid the first command gives you. This will be a long string of hex characters. You will have to type it out for the first command, but after that, just press the up key, and your previous command will show up, just delete the "pae ForceEnable" part, and add then ext command. The entire command output (above part included) can be seen below.
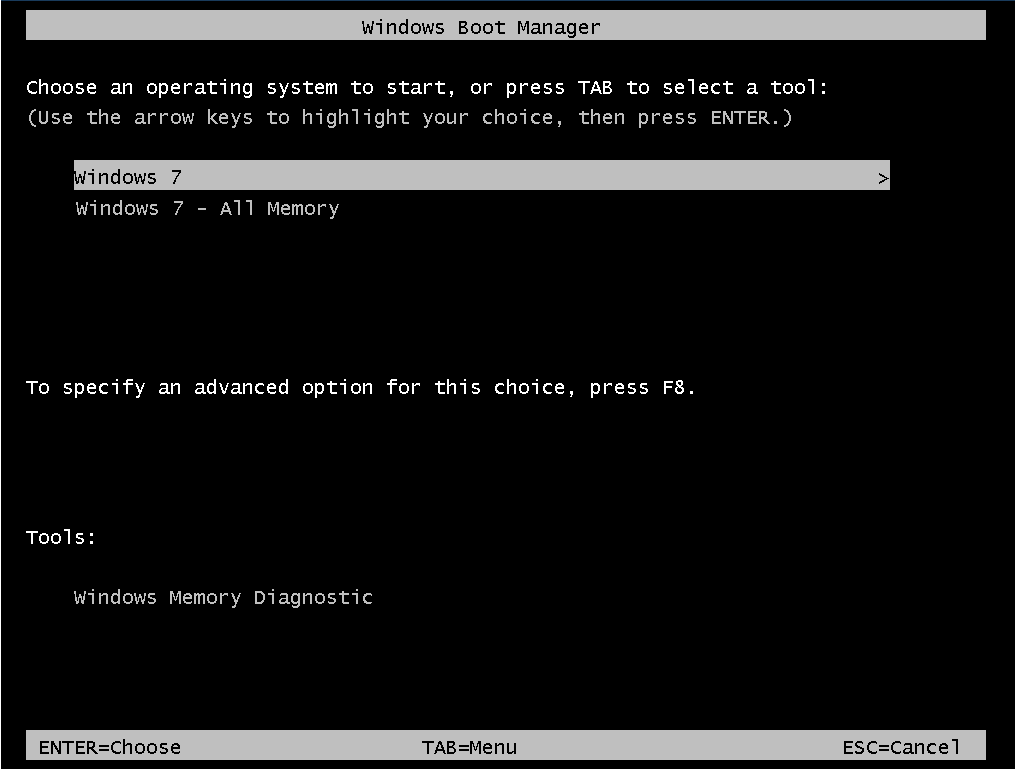
Now reboot and you select your new setting. It will appear as if it is a separate Windows installation (but its obviously not). If everything worked Windows should boot like normal. If Windows goes in to repair mode, you probably didnt redo the checksum\resign the modified kernel property. If you run in to another issue, the hack might not work on your system. Dont panic, simply reboot and use the normal "Windows 7" option. If its still not working properly (this shouldnt happen), then reboot again, and repair the Windows installation (remember you dont need the install disk to do this anymore).
Results on my VMware Virtual Machine with it set to 4096MB:
BEFORE:
http://i175.photobucket.c.../windows7x86before.png
AFTER:
http://i175.photobucket.c...6/windows7x86after.png
Conclusion:
The process is by no means simple or safe, but it does work in most cases. If you have a computer with 4GB of RAM or more and only have a 32 Bit version of Windows Vista\7, then this hack can save you the $100 if you were going to go out and buy a x64 version of Windows. There are a lot of OEM's that still ship 32 Bit versions of Vista\7 with computers that have 4GB of memory (and sometimes more), and there is no reason that you should be stuck with the 4GB limitation in all cases.
Good Luck!
4 comments:
he NT family of Windows systems was fashioned and marketed for higher reliability business use. The first release was NT 3.1 (1993), numbered "3.1" to match the consumer Windows version, which was followed by NT 3.5 (1994), NT 3.51 (1995), NT 4.0 (1996), and Windows 2000, which is the last NT-based Windows release that does not include Microsoft Product Activation
its nice thing about windows
wat about using the 64bit windows for thids method if possible rply....
Nice post! Was very helpful
Thanks :)
loveing it
Post a Comment